
How to Style your Console Table
Are you ready for some console FUN? That’s right, get excited because console tables are truly one of my all time favorite things to decorate. They are so simple but can carry so much weight in a room. I will admit, when I get bored, I will go around my house switching up all my console & buffet tables just for fun. Sounds lame as I type this out… might delete that later.
Today I am turning my love for decorating console tables into a visual example with easy steps to follow so you can do the same in your home! I will be providing examples for console tables, but really this can apply to anything with a large area that needs to be filled up– for example, buffet tables, dressers, etc. Console tables can be intimidating to decorate because you want them to look good but also serve a functional purpose. Well, I am glad you’re here. Let’s get to it!


Of course, console tables can be decorated in every which way possible. However, I often find that when I decorate a console table, I like them to have different layers, sizes and textures. I want my eye to feed from one object to the next like a rollarcoaster of accessories. Because of this, I have come up with an easy way you can decorate your console table that I like to call “THE DIP”. That’s right… when you dip, I dip & we will dip together to create the best console table your space has ever seen.
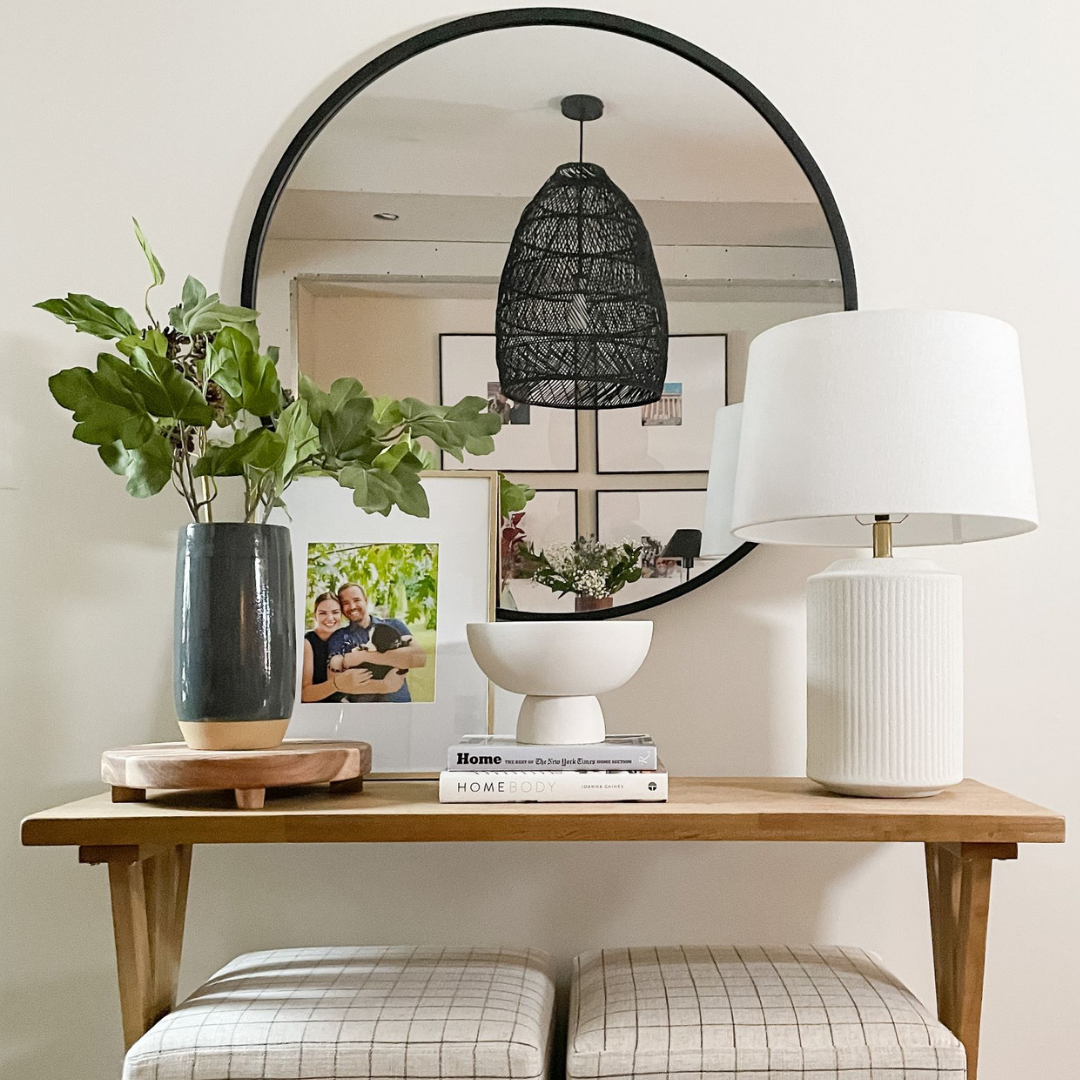
I have identified 7 main objects that will make it SO EASY for you to follow. The 7 objects link to the image below!


1
Choose a Console Table: Let’s start with why you’re here! This might seem the hardest part in your console decorating journey, but don’t let it be! Don’t feel so pressured because the first thing people will see will not be the console table…shocking, I know! It might be a close second. When picking out your piece of furniture it is important to look at the dimensions to ensure they will fit into your space. You certainly don’t want it to be too small and feel out of place but you also don’t want it to take up the entire room. In addition, be picky about your color of console tables. Of course they come in all different colors so make sure you get the color that feels right with your room.
Here are a few of my all time favorite tables: Herriman Console – Target // Palmdale Woven – Target // Woven Drawer Black Console – Target
2
Pick a Focal Point: Now that you have your table, next you need to establish a focal point behind the table. Think: this is what your eyes will go to when you walk into the space. Overall the focal point should be almost as big as the table, but not more! Try to center it in the middle of the table. The focal point might be a large mirror, picture, floating shelves or multiple pictures hung together to create a gallery wall. Whatever you choose, make it be a statement!
Here are a few of my all time favorite focal points: Round Black Mirror // French Country Mirror// Gallery Wall Frames

BUT WAIT! Before moving onto objects 3-6, it is time to decide how you are going to divide your table. Most of the time, a table can be divided into 3 separate parts. With larger tables, you might decide to divide it into 4-5 separate parts. This also is dependant on how big your accessories are. When I begin decorating a console table, I like to visualize how I will divide the table up so I can add decor to each section. It also helps me space the decor out so it doesn’t feel so cluttered. When I decorate, I like to think less it more!
3
The Tallest Shall Win: Now that we have the table and the focal point, we can start adding decor to the table. When doing so, it is important to vary the height of the objects to create THE DIP. Try to pick objects of different heights so they aren’t the same. The tallest item on the table might be a lamp or maybe a vase of flowers. You can add this object to either side of your table. Depending on your table size, you might duplicate the large item to put on both ends of the table to create unison.
Here are some of my tallest objects: Ceramic Table Lamp // Table Olive Plant // Decorative Vases
4
A little bit smaller now: Select an object slightly smaller than the tallest object you previously selected & place it on the other end of the table. This will make the table feel balanced. The object could be a vase with flowers or a bowel on top of stacked books. I also suggest layering objects on top of each other to create more dimension. Layer a bowl on top of 2 books or a vase on top of a decorative cutting board!
Some of my favorite decorative accents: Studio McGee Accents
5
Middle Child: Now to choose your middle objects. This is where we do the dip ladies & gentlemen. These are often smaller than the end objects and can include: a bowl, small basket, stacked booked, propped up frame, plant, candle sticks, etc. If you didn’t layer object #4, you can do so for object #5! I often use a “catch all” bowl as my middle child. This allows the table to be functional as I need it.
6
Optional Secondary Dip: Depending on how you divided up you table, you can add even a smaller object than chosen in step 5. This might be a candle, small plant, frame, etc.
7
The Bottom Bunk: Don’t forget about underneath– it needs just as much love as the top. This space can be just as functional as pretty. You could add baskets that act as hidden storage or you could add ottomans that easily pull out for extra seating.
And there you have it- a successful DIP! Wasn’t that fun? Follow these steps and I am confident you will have a show-stopping console table design.
Comment below with any questions! Talk to you soon!
xoxo
Alidia


Recent Comments